🍫 <𝗚𝗜𝗩𝗘𝗔𝗪𝗔𝗬> 🍋
🎄Xmas came early for us!🎄Are You In for some treats of handmade chocolates and zesty lemons addictive desserts from HBB @sherbility⁉️
⚠️#warning ⚠️ - swipe with caution and don’t 🤤🤤🤤🤤🤤all over 😋
😍 We are super in love with these delicious homemade baked from @sherbility that warmed not only my mouth but heart as well!
Indulging in the warm fluffy SBROWNIES ❤️ of all brownies, with quality toppings of sea salt or crunchy biscoff! Have both “sensations” In one box!
Tho We kept in the fridge and warm it the next day, never to expect it’s still as soft and full of all that chocolatety but not extreme sweet goodness! Noah finished half the box during his HBL today! 😛
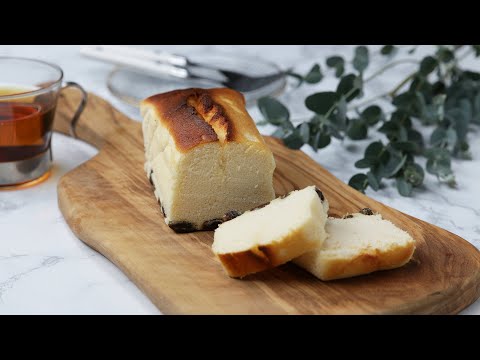
If you enjoys bakes with lemon zest, better not miss out @sherbility’s signature Lemon Pound cakes comes in loaf and pound cube sizes!
🍋Top with lemon icing and extra lemonade pipette okay! Squeeze in the tube of sweet honey, and enjoy the soft and tangy bake that still taste just liked out from the oven! Their recipe for baked are really good!
Not to forget how much chocolate bits are found in the palm size muffins, it’s perfect for any “occasions” - especially in bed binge watching netflix 😝😝😝
🎁 𝐆𝐎𝐎𝐃 𝐍𝐄𝐖𝐒 🎁
Together with @sherbility , TWO lucky winners will receive below prize! Here’s how TO WIN this:
❤️ A set of Sbrownie double joy (sea salt /speculoos) & Lemon pound (worth $31)
➕ 𝙁𝙤𝙡𝙡𝙤𝙬 @sherbility
➕ 𝙁𝙤𝙡𝙡𝙤𝙬 @familystaysg
➕ 𝙏𝙖𝙜 as many friends as you can, per tag per comment!
➕ 𝙍𝙚𝙨𝙝𝙖𝙧𝙚 this post onto your IGS, please tag us both so we can see! 🪄
The Giveaway ends on 3rd Oct 2021, only limit to Singapore residents. Winner will be announced on my IG, so 𝙎𝙖𝙫𝙚 this post to stay tune!
.
.
.
#familystaysg #sgreview #sgmoms #sgmums #sgfoodtrend #sgfoodstagram #sgfooddiary #dessertsofinstagram #dessertsg #sghomebaker #sghomebakers #dessertporn #supportlocalsg #sglocalfood #sglocalbusiness #sg #singapore #festivebakes #sinfulindulgence #brownies #lemonpoundcake #sgbakery #homebakerysg
同時也有29部Youtube影片,追蹤數超過0的網紅cook kafemaru,也在其Youtube影片中提到,人参を皮ごとすりおろして加えた栄養満点キャロットケーキです。 材料が色々入った分だけケーキは深い味わいになります。 キャロットケーキなのにうっとりするおいしさに^^ 材料をそろえたらボウルに順番に入れてよく混ぜる! パウンド型でこんな美味しいキャロットケーキが焼けます。 ぜひ作ってみて! レシピは...
lemon loaf 在 Facebook 的最佳貼文
Baking experiment #130921: Tried jazzing up an old recipe - one that many of you said is good - by making cupcakes instead of a loaf. It’s probably a little unconventional to have a heavy cupcake, but the lightness of the Vanilla Mascarpone Cream balances it out quite well.
For recipe, see my post on Lemon Butter Cake with Chia Seeds. #lemonbuttercake #chiaseeds #vanillamascarponecream #cupcakes #teatime #goesgreatwithblackcoffee
lemon loaf 在 Facebook 的最佳解答
#斯佩爾特與杜蘭小麥完成的Hybrid啤酒花米麴酵水帶蓋吐司.
#第一次接蛋糕單.
#簡單蛋糕裝飾修飾
#德國小一新生入學必備Zuckertüte
發文:
http://foodchainunme.blogspot.com/2021/09/hybrid-zuckertute.html
全文轉貼如下:
今天的文應該不會很長XD 因為我昨天只睡兩小時@@
同事的女兒今年當小一新生. 這個入學趴在德國人的眼中非常重要. 所以早早就已經籌備了. 我很感激他給我這個重責大任. 因為他應該是七月時就已經問我可以不可以幫他們做蛋糕...
當時滿口答應. 但時間愈近. 愈覺得手腳都被綁住. 例如. 我兒子去瑞士找房我們也不能跟著去. 因為這個蛋糕得周五~週六製作. 週六等同事來拿.
八月初, 同事被派到美國出差. 所以換他的女朋友接棒問@@ 她非常緊張, 因為怕我會忘記這件事.
我們討論了一下. 她說她想要有這樣的蛋糕....
Dr. Oetker Zuckertüten-Torte zum Schulstart
https://www.oetker.de/rezepte/r/zuckertueten-torte-zum-schulstart
德國小一生入學時都會有這樣的一個圓錐形的糖果桶. 說桶真的不誇張. 因為它至少都有小孩一半身長. 裡面裝滿糖果. google 看圖片
https://www.google.com/search?q=zuckert%C3%BCte&tbm=isch&ved=2ahUKEwi8hfDs1eXyAhUBNRoKHXyyD3cQ2-cCegQIABAA&oq=zuckert%C3%BCte&gs_lcp=CgNpbWcQAzIHCCMQ7wMQJzIHCCMQ7wMQJzIECAAQEzIECAAQEzIECAAQEzIECAAQEzIECAAQEzIGCAAQHhATMgYIABAeEBMyBggAEB4QE1Dm3wNYneQDYLjoA2gAcAB4AIABaogB4AKSAQMzLjGYAQCgAQGqAQtnd3Mtd2l6LWltZ8ABAQ&sclient=img&ei=nJUzYbzHAYHqaPzkvrgH&bih=746&biw=1334
我當時看, 覺得很簡單. 也有想, 既然你都有連結為什麼不能自己做呢? 最主要是我本人脫離使用色素的蛋糕很久了. 所以並沒有很喜歡這個蛋糕裡的食材. 後來, 她還特別強調來賓有20位. 她跟她的媽媽都會做一些食物. 但這個蛋糕是當日最重要的東西. 我的壓力就大了!
越到交蛋糕日才想是不是要參考看看食譜..... 挖~ 一看不得了. 好多奶油....
反正. 我當時就決定先用自己的想法. 我的想法是做海綿蛋糕體. 外觀跟它相似就好.
於是我開始想試試別人的基礎海綿蛋糕配方....
因為我有很多NW 模具. 所以我想. 應該是可以吧? 因為海綿蛋糕不就是很多麵粉形狀不太會縮掉嗎?
我錯了! 第一個在周四時做. 縮水很醜. 所以連照都不想照. 然後就給我女兒當早午餐吃掉了. 然後. 我想, 我應該可以用NW 的輕薄鋁模( 12杯大模具) 做. 很豪邁地打了9顆全蛋...
結果它卡住了. 當時已經是昨晚9點! 我真的有種完蛋的感覺.... 所以, 我又轉回去看原始食譜.
決心給它一個機會. 然後~ 它脫模失敗!!!
真是欲哭無淚了我~~~
時間來到12點. 我的吐司出爐了. 我又繼續想辦法...
我在吐司烘烤的這個期間有google 過如何把那個蛋糕黏起來! 但是. 我看到的幾乎都是比我脫模不成功還慘很多倍的方式. 通常就是教你如何下次不會有這樣的成績.....最主要是這個蛋糕還要切成三片. 我不覺得我繼續做會好看. 因為這是很容易乾裂的磅蛋糕.
於是我就想. 反正我也沒那麼多奶油了. 那就再繼續用蛋做海綿蛋糕吧!
所以, 我為了這個蛋糕訂單. 總共做了四個基礎蛋糕.....
這兩個是蛋糕送走後要自行解決的. 我跟老爺說, 這是我自己失敗的問題. 所以雖然我還沒有跟同事說蛋糕的價格. 但這就是我自己功力不足需要付出的代價....
反正, 為了這個訂單, 我真的以訂單之名血拚之實買了不少( Haribo後來沒用到. 只有同事帶兒子來拿蛋糕時分了一包給他)
反正~ 事情因為我去睡覺兩小時起床之後有所改變!
因為這個蛋糕被我冰起來. 可以脫模成這樣...
拍刮掉多餘的蛋糕屑以後.... 沒有甚麼大問題. 所以就用它了
基礎海綿蛋糕刷上糖漿後, 使用這一罐Lemon Curd 抹一薄層. 再加上那個連結網站上的鮮奶油餡配方. 不過, 我的用量是這樣:
1 包. Dr. Oetker Original Puddingpulver Vanille-Geschmack
2 大匙 糖
350 ml 芒果汁
ˋ之後混入:
400 g
冰的鮮奶油( 30%脂肪)
2 包. Dr. Oetker Gelatine fix 及兩大匙白糖
( 題外話. 真的是這個食譜讓我知道Dr. Oetker 有很多很方便使用的東西. 我是看著才想到要買的)
剩很多. 反正我還有兩個蛋糕可以裝飾( 翻白眼)
我本來是要做白巧克力甘納許的. 但是想到可能沒辦法黏上那些亮晶晶裝飾. 所以我就融了一大堆白巧克力趁溫溫的直接倒. 動作有點慢. 蛋糕有點涼. 所以就沒有很光滑. 但至少... 該遮的都遮了. 我覺得這些裝飾糖粒是真的是救星. 因為越流倒底時會越慢. 所以我只好用抹的. 那一定會有痕跡. 使用糖粒就可以改善.
之後. 因為上面的不平均也很明顯. 所以.... 我將色素加在白巧克力中.... 並利用未乾的時候黏上英文單字糖片( 真的找很久)
我在中間也放很多糖粒. 因為屆時要把圖上的這個甜筒裝上條狀的軟糖. 然後放進去站! 這個我請同事的女朋友自己做. 因為怕運輸時發生問題. 所以我這樣裝著. 我找到這樣的條狀軟糖. ( 其實並不在上上上... 個採購圖中
這就是我的第一次蛋糕單. 我覺得蠻有意義的. 雖然目前頭暈腦脹. 但整個人真的有鬆了一口氣的感覺...我想. 下次接單我要考慮了... 覺得有被綁住的感覺.
紀錄一下這個吐司吧.
承上一篇文: 關於斯佩爾特粉的一些操作想法與經驗分享 How I handle Spelt flour. 包含全穀粉的操作gliadin麥醇溶蛋白 / glutenin谷蛋白 杜蘭小麥粉應用 一起讀書!
繼續兩種粉的應用. 我覺得非常好耶! 因為比較不黏. 我使用的食譜是臨時寫出來的:
麵團總重800 g 放2840 ml 日式一斤半吐司模具. 容積比3.55
1. 90% Dinkelmehl 630 ( 斯佩爾特低礦物粉)
2. 10% 杜蘭小麥粉
3. 7% 室溫奶油
4. 27% 牛奶 ( 1.5%乳脂)
5. 40% 啤酒花米麴酵水
6. 2 % 糖
7. 3% 蜂蜜
8. 0.4% 麥芽精
9. 2%鹽
10. 0.6% 鮮酵
處理方式與之前的比起來 只使用啤酒花米麴種完成的100% 百分百全穀斯佩爾特麥馬斯卡彭乳酪帶蓋吐司 Spelt whole meal Mascarpone toast bread Pullman loaf Dinkelvollkorn Toastbrot only fermented with Hops Koji yeast water
http://foodchainunme.blogspot.com/2021/07/100-spelt-whole-meal-mascarpone-toast.html
在Fermentolyse 上只做10分鐘. 基發時間我自己定為5小時. 第四小時做一次取出灑粉翻摺. 這個麵團的後發超級久. 就是本來定1.5小時. 後來, 真的就完全不管它的狀態... 有點以為會沒有滿模. 但實際上. 這個麵包非常有嚼勁. 吐司皮也比一般的韌一點.
應該會多做幾次... 因為我女兒抱怨每天都吃全穀很久了~~~
我兒子回到家了.已經決定了要住的地方. 剩下的就是幫他搬東西了.... 那天, 他經過一家有機店. 問我要不要買麵粉...
所以我得到這兩包有機瑞士麵粉... 瑞士的特殊麵粉就是這兩種. Ruchmehl 是非常營養又需要技術研磨的小麥粉. Zopfmehl( 辮子麵粉) 則是跟瑞士人每周日會自己做辮子麵包的習慣有關. 我發現這種麵粉每次都是以小麥粉為主. 添加約10% 的斯佩爾特粉. 這包加的是 Urdinkel ( 比較沒有基改, 比較古老的斯佩爾特小麥. 想知道詳情也可以蒐一下我的格文) 我自己覺得有可能跟上一篇文提到的一樣. 通常, 辮子麵包都會加蛋. 這樣下來. 分量沒很多的斯佩爾特加入後會不會就容易延長更好? 麵包質感更絲滑呢?
.
.
.
.
怎麼可能不繼續做包呢?
lemon loaf 在 cook kafemaru Youtube 的精選貼文
人参を皮ごとすりおろして加えた栄養満点キャロットケーキです。
材料が色々入った分だけケーキは深い味わいになります。
キャロットケーキなのにうっとりするおいしさに^^
材料をそろえたらボウルに順番に入れてよく混ぜる!
パウンド型でこんな美味しいキャロットケーキが焼けます。
ぜひ作ってみて!
レシピは下にあります↓
==================================================
最新刊も発売中~本屋さんで見てもらえると嬉しいです!
みんなぜひぜひ買ってねーーーー!!!
大人気YouTuber “cook kafemaru”の
「罪深いスイーツ」
おかげ様で2刷になりました。
Amazonはこちらから購入できます↓↓↓
https://www.amazon.co.jp//dp/4046048948/
==================================================
「世界一作りやすいおうちスイーツ 」
もおかげ様で10刷になりました。
どうもありがとうございます。
Amazonで購入できます。↓↓↓
https://www.amazon.co.jp/dp/4046045116/
もしもお住いの近くの本屋さんになかったら、セブンイレブンの
オムニ7でネット予約し、セブンイレブン店頭受け取りで買うことができます!
=============================================
【Ingredients】 7in(18cm)×3in(8cm)loaf pan
For Carrot Cake
2 Eggs
80g Rice Bran Oil(or Oil of your choice)
1 tsp Lemon juice
50g Cane sugar(or Granulated sugar)
120g Carrot, grated
★100g Cake flour
★50g Almond flour
★4g Baking powder
45g Rum raisins
50g Walnuts, roasted
For Topping
15g sliced almonds
【Directions】
①Pour hot water onto the raisins to soften. Drain off the hot water.
Cut the walnuts into small pieces.
Carefully wash the carrot (Don’t peel the skin)
Grate the carrot coarsely.
②Put eggs in a large bowl and mix well.
③Add the vegetable oil (little by little)and mix well with a whisk for 2 mins until combined.
④Add lemon juice and cane sugar.
After adding all, mix well.
⑤Add the carrot and mix well with a spatula.
⑥ Add all of the dry ingredients(★) and fold until the powderiness disappears.Fold it 15-20 times.
⑦Add raisins and walnuts,mix.
Put it into the prepared pan.
⑧Line up the sliced almonds on top.
⑨Bake at 180℃ / 356°F for 35-40 minutes.
⑩Remove the cake from the pan while it's warm and wrap it with plastic wrap.
When cooled thoroughly,slice and serve.
***れしぴ置き場***
【材料】18cm×8cm×H6cm パウンド型 1台分
For Carrot Cake
卵(L) 2個
米油 80g
(またはお好みのオイルで、ココナッツや太白ごま油など)
レモン汁 小さじ 1
きび砂糖(or グラニュー糖) 50g
すりおろした人参 120g
★薄力粉 100g
★アーモンドプードル 50g
★ベーキングパウダー 4g
ラムレーズン 45g
胡桃、ロースト 50g
For Topping
スライスアーモンド 15g
【作り方】
①レーズンはお湯をかけて柔らかくし、お湯を切っておく。
胡桃はフライパンやトースターでローストして細かく切る。
人参は皮付きのまま良く洗って粗くすりおろす。
②ボウルに卵を割り入れ良く混ぜる
③米油を少しずつ加えて2分ほどよく混ぜる。
④レモン汁ときび砂糖を加えてよく混ぜる。
⑤人参を加えてゴムベラで混ぜる。
⑥粉類(★)をすべてふるって加え、粉っぽさが無くなるまで15-20回混ぜる。
⑦最後にレーズンと胡桃を加えて混ぜる。
パウンド型に流し入れる。
⑧上にスライスアーモンドを乗せる。
⑨180℃に温めたオーブンで35-40分焼く。
⑩粗熱が取れて手で触れるくらいになったら、ラップをするか、ビニール袋に入れて冷ます。
完全に冷めたらスライスしてどうぞ^^
***京にんじん(金時にんじん)を使いました、紅色で栄養価も高く甘みも強いのでおススメです。
***今回はお子さんも食べられるといいと思い、スパイスは敢えて入れていません。
良かったらシナモン、ナツメグ、カルダモン、オールスパイスなど加えてみてください^^
![post-title](https://i.ytimg.com/vi/DjDZhlQ3_KY/hqdefault.jpg)
lemon loaf 在 Tasty Japan Youtube 的最讚貼文
しっとりふわふわのチーズケーキに、ラムレーズンのアクセント。まるで有名店で売っているような、スフレチーズケーキはいかがですか?
おうちで再現しやすいよう、シンプルな工程で作ったレシピです。ぜひ作ってみてくださいね♫
スフレチーズケーキ
18cmパウンド型 1台分
材料:
クリームチーズ(室温に戻す)100g
卵黄 2個
薄力粉 30g
牛乳 40ml
レモン汁 大さじ1
卵白 2個分
砂糖 50g
レーズン 30g
ラム酒 大さじ2
作り方:
1. 型にサラダ油(分量外)を塗り、紙をしいておく。
2. レーズンを熱湯(分量外)に15分ほど浸したら水気を切って耐熱容器に入れ、ラム酒を加えて、600Wの電子レンジで30秒加熱する。完全に冷めたらペーパーでしっかりと水気を拭き取り、(1) の底に散らしておく。
3. オーブンは170℃に予熱しておく。
4. ボウルにクリームチーズを入れてゴムベラで練る。卵黄を1個ずつ加え、なめらかになるまで泡立て器でよく混ぜる。
5. 薄力粉をふるい入れ、粉気がなくなるまでよく混ぜる。
6. 牛乳とレモン汁を加えてよく混ぜたら、生地を裏ごしする。
7. 別のボウルに卵白を入れて、ハンドミキサーを使って高速で泡立てる。白っぽくなったら砂糖を3回に分けて入れ、ツノが立つくらいのしっかりとしたメレンゲになったら、ハンドミキサーを低速にして1分ほど混ぜ、気泡を安定させる。
8. メレンゲの1/3量を(6)で裏ごしした生地に入れ、泡立て器でよく混ぜてなじませる。
9. 残りのメレンゲを半量ずつ加え、ゴムベラでやさしく混ぜ合わせたら、(2) に流し入れる。深めの容器に入れて、型の半量程度の高さまで熱湯(分量外)を注ぎ入れる。
10. オーブンの温度を160℃に下げて20分焼く。その後、140℃で60分焼き、そのまま庫内に10分程度置いて冷ます。
11. 型から取り出して紙を外し、好みの大きさに切り分けたら、完成!
===
Here is what you'll need!
Fluffy cheesecake with rum raisins
Servings: 1 loaf pan (18cm)
INGREDIENTS
100g cream cheese (room temperature)
2 egg yolks
30g flour
40ml milk
1 tablespoon lemon juice
2 egg whites
50g sugar
30g raisins
2 tablespoons rum
PREPARATION
1. Grease a loaf pan thoroughly using vegetable oil. Line with parchment paper.
2. Soak raisins in the hot water for 15 minutes, then drain. Put raisin and rum in a heat-resistant dish and microwave for 30 seconds at 600W. When cooled, pat dry with kitchen paper. Line rum raisins on the bottom of the loaf pan.
3. Preheat oven to 335˚F (170˚C).
4. Knead cream cheese with a rubber spatula in a bowl. Add egg yolks (one at a time) and mix until smooth.
5. Sift flour into the bowl and mix well.
6. Add milk and lemon juice. Strain the batter throw a sieve for smooth texture.
7. Whisk egg whites in another bowl. Add sugar (3 separate times), whip to stiff peaks to make mélange.
8. Spoon 1/3 of mélange into the bowl and combine well.
9. Add rest of mélange (half at a time) into the bowl and mix to just combine. Pour into the loaf pan (2). Put the loaf pan in the large dish and pour hot water into the dish to cover the half of the loaf pan.
10. Lower the oven temperature to 320˚F (160˚C), then place the loaf pan to bake for 20 minutes. Bake another 60 minutes at 285˚F (140˚C). Leave it in the oven for 10 minutes.
11. Remove from the loaf pan. Slice to serve.
12.Enjoy!
#TastyJapan
#レシピ
MUSIC
Licensed via Audio Network
![post-title](https://i.ytimg.com/vi/Xme2jY7NMiA/hqdefault.jpg)
lemon loaf 在 Tasty Japan Youtube 的精選貼文
みんな大好きなチーズケーキのご紹介です!
見た目もかわいくクッキーアンドクリームをトッピングにして、スティック状にアレンジ♡
バレンタインのプレゼントにもおすすめです♪
とっても簡単なレシピです!ぜひ作ってみてくださいね♪
簡単スティックチーズケーキ
15cm角型 1台分
材料:
■ボトム
ココアビスケット 100g
溶かしバター(無塩)20g
牛乳 大さじ2
■フィリング
クリームチーズ(室温に戻す) 200g
砂糖 60g
生クリーム 100ml
卵 2個
コーンスターチ 大さじ2
レモン汁 大さじ1
バニラエッセンス 適量
ココアビスケット(飾り用)適量
作り方:
1. ボトムを作る。チャック付きの袋にビスケットを入れて口を閉め、麺棒などで叩いて細かく砕く。ボウルに入れて、溶かしバターと牛乳を加えて、混ぜる。
2. 紙をしいた型に(1) をしきつめてスプーンで強く押さえたら、冷蔵庫に入れて冷やし固める(約30分)。
3. オーブンは170℃に予熱しておく。
4. ボウルにクリームチーズを入れ、ゴムベラで練ってほぐす。
5. 生クリームと砂糖を入れてハンドミキサーで混ぜる。
6. 溶き卵を2回に分けて加え、その都度よく混ぜる。
7. コーンスターチ、レモン汁、バニラエッセンスを加えて混ぜたら、(2) の型に流しし入れ、型ごと台に2-3回打ちつけて空気を抜く。
8. 飾り用のココアビスケットを手で砕いて、生地の表面に差し込むようにのせたら、170℃に予熱したオーブンで40-50分焼く。
9. 焼き上がったら竹串をさしてみて、ドロっとした生地がついてこなかったら型に入れたまま粗熱をとり、さらに冷蔵庫で6時間〜一晩冷やし固める。
10. 紙を外して、好みの大きさ(動画は5等分)に切り分けたら、完成!
Here is what you'll need!
Super rich! Biscuit cheesecake bars
Servings: 1 loaf pan (15cm)
INGREDIENTS
◆Crust
100g cocoa biscuits
20g melted butter (unsalted)
2 tablespoons milk
◆Filling
200g cream cheese (at room temperature)
60g sugar
100ml heavy cream
2 eggs
2 tablespoons corn starch
1 tablespoon lemon juice
Some vanilla extract
Some cocoa biscuits (for toppings)
PREPARATION
1. To make crust, crush biscuits in a zipped top bag with a rolling pin. Mix crushed biscuits with melted butter and milk in a bowl.
2. Line a loaf pan with a parchment paper, press crushed biscuits (1) down into the bottom of the pan with a spoon. Refrigerate for 30 minutes.
3. Preheat the oven to 170˚C (335˚F).
4. In a bowl, stir cream cheese with a rubber spatula until smooth
5. Add heavy cream and sugar into the bowl and mix.
6. Add beaten eggs. (One egg at a time, make sure to mix well each time you add the egg.)
7. Add corn starch, lemon juice, and vanilla extract. Mix well and pour into the loaf pan (2). Drop the pan on the kitchen counter a couple of times to remove air.
8. Break cocoa biscuits (for toppings) and place on top. Bake for 40 to 50 minutes.
9. The cake is done if a toothpick inserted in the center comes out clean. Let cool. Refrigerate for 6 hours.
10. Remove from the pan. Slice as you like.
11. Enjoy!
#TastyJapan
#レシピ
MUSIC
Licensed via Audio Network
![post-title](https://i.ytimg.com/vi/FYw_MGlEVp4/hqdefault.jpg)
lemon loaf 在 Simple lemon loaf | Recipe - Pinterest 的推薦與評價
Jan 9, 2017 - If you're looking for easy dessert recipes that aren't heavy on the chocolate and sugar, this simple lemon loaf has your name written all over ... ... <看更多>